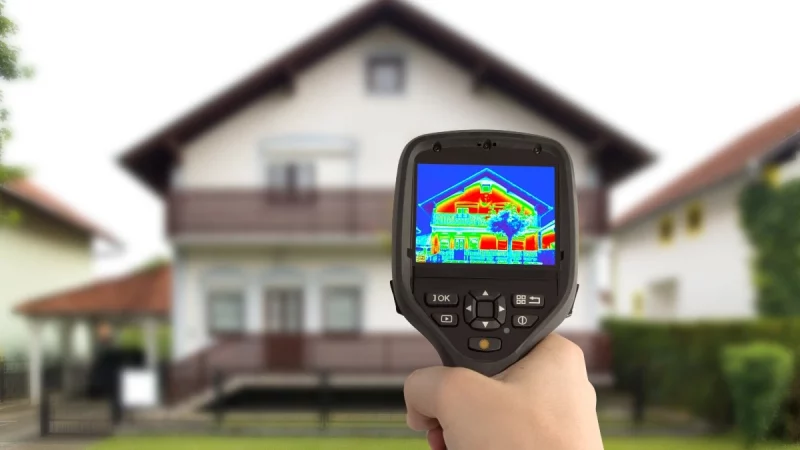
In the world of energy conservation, identifying and fixing energy leaks is crucial for both environmental sustainability and economic efficiency. Fortunately, modern technology has come to the rescue using infrared cameras.
These devices have the power to unveil the invisible world of heat, helping us detect energy leaks with unmatched precision. In this article, we’ll explore how they work and how to fix energy leaks in our homes and businesses.
How Does The Infrared Camera Work
Infrared cameras, also known as thermal imaging cameras, operate on the principle of capturing infrared radiation emitted by objects due to their temperature.
The operation of an infrared camera, also known as a thermal imaging camera, is akin to peering into a hidden dimension of heat. At its core, this innovative device relies on the principle that all objects with a temperature above absolute zero emit infrared radiation.
As the camera’s lens focuses on a scene, it captures this invisible thermal energy and converts it into a mesmerizing visual representation. Within the camera, a specialized sensor detects these infrared signals and transforms them into a spectrum of colors.
Warmer temperatures appear as vibrant reds, oranges, and yellows, while cooler areas manifest as calming blues and greens. The resulting thermal images paint an intricate tapestry of the temperature variations across surfaces, unveiling the secrets of heat distribution that escape human sight.
In the hands of users, the infrared camera serves as an illuminating tool to reveal energy leaks, identify hidden faults, and unlock a world of insights that would otherwise remain concealed in the cloak of invisibility.
How To Detect Energy/Heat Leaks
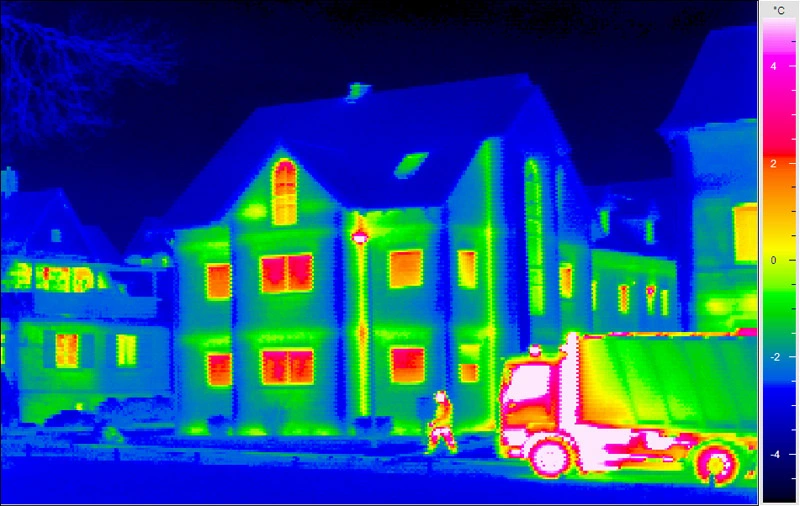
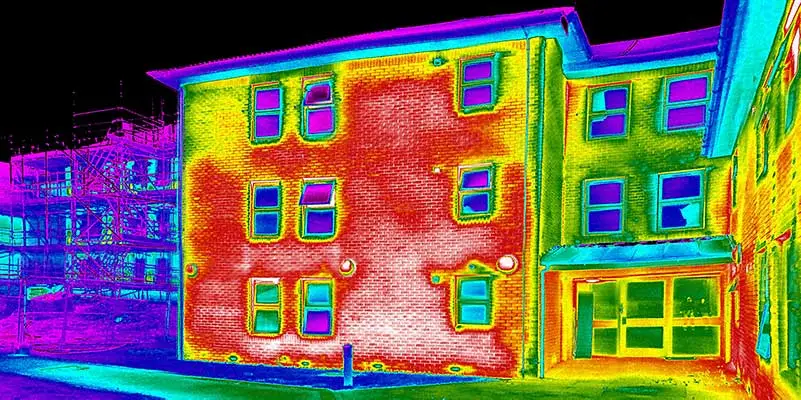
Infrared cameras excel at uncovering the most common energy leak culprits. In homes, poorly insulated walls and roofs often appear as glaring red patches on the camera screen, indicating a significant loss of energy.
Similarly, drafty windows and doors can be easily detected, allowing homeowners to take prompt action. In commercial settings, faulty HVAC systems and insulation gaps become evident, empowering businesses to make smart decisions to enhance energy efficiency.
Spotting energy leaks using an infrared camera is surprisingly simple yet powerful. With the right approach, you can efficiently identify areas of energy inefficiency and take corrective actions. Let’s dive deeper into how to make the most out of an infrared camera to spot energy leaks:
- Prepare Your Environment: Before you begin your infrared inspection, make sure to create the ideal environment for accurate readings. It’s best to conduct the inspection on a day with a significant temperature difference between the inside and outside of the building. This temperature variance enhances the visibility of heat signatures, making energy leaks more apparent.
- Calibrate Your Infrared Camera: Calibrating your infrared camera is vital to ensure precise temperature measurements. Follow the manufacturer’s instructions to calibrate the camera correctly before starting your energy leak detection journey. This step guarantees that your camera provides reliable data, giving you the confidence to make informed decisions.
- Plan Your Inspection Route: For a methodical and efficient inspection, plan a systematic route through the building. Begin at the outer perimeters, scanning walls, windows, and doors from the outside. Then, move indoors and scan each room, paying close attention to areas prone to energy loss, such as corners, edges, and joints.
- Use the Right Settings: Most infrared cameras offer various settings to customize the image display and temperature range. Set the appropriate temperature range and adjust the camera settings to display thermal contrasts clearly. This will help you identify even subtle differences in temperature, which might indicate potential energy leaks.
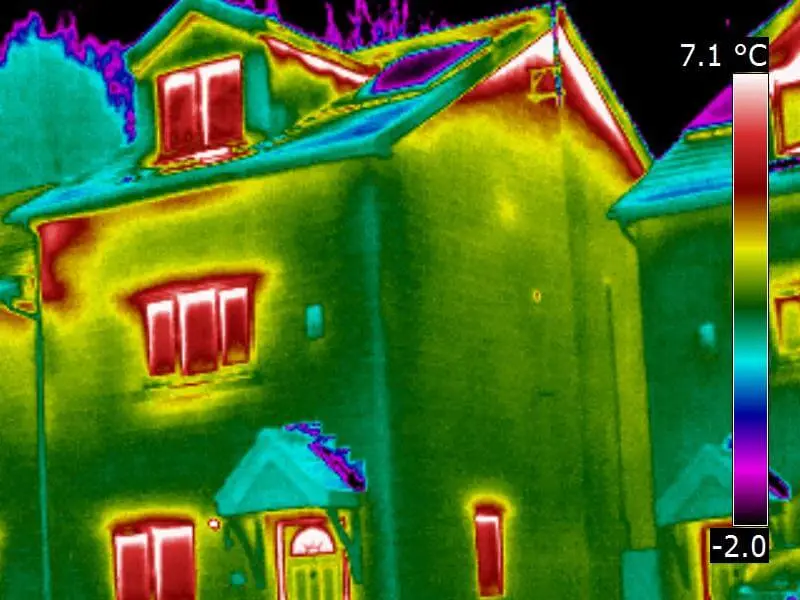
- Identify Anomalies: As you scan the building, keep an eye out for anomalies in the thermal images. Energy leaks often manifest as hotspots (red or warm colors) in the winter when heat escapes and as cold spots (blue or cool colors) in the summer when conditioned air leaks out. Note these anomalies and prioritize them for further investigation and remediation.
- Verify Potential Leaks: While infrared cameras are powerful tools, they can also pick up false positives, such as reflections or surface variations. To verify potential energy leaks, use a handheld smoke pen or thermal tracer to create artificial airflow. Observing the camera’s response to these controlled tests will help you distinguish real energy leaks from false alarms.
- Document and Analyze Findings: Record all the thermal images and observations during your inspection. These records will serve as valuable references for future assessments and as evidence of energy leaks when discussing potential solutions with contractors or building owners. Analyze the data to identify patterns and prioritize areas that require immediate attention.
- Take Corrective Actions: Once you’ve identified energy leaks, it’s time to take action. Use the thermal images as a roadmap for addressing the most critical issues first. Employ the fixes we mentioned earlier, such as sealing cracks, enhancing insulation, and upgrading windows and doors. Implement these solutions one step at a time, and monitor the changes using follow-up infrared inspections to ensure their effectiveness.
- Schedule Regular Inspections: Infrared cameras are not one-time-use devices. To maintain energy efficiency and prevent new leaks from developing, schedule regular infrared inspections. Yearly or biennial inspections can help you stay on top of your energy conservation efforts, saving you money and reducing your environmental impact in the long run.
Using the Thermal Camera in Summertime
During the scorching summer months, the thermal camera becomes an indispensable tool for identifying heat-related issues and optimizing energy usage. To achieve the best readings, start by conducting inspections during the hottest part of the day when temperature differentials are most pronounced.
Start indoors and focus on potential hotspots (most reddish) around windows, doors, and walls to detect escaping cooled air. In these areas, the temperature will certainly be higher because the energy from outside is entering inside.
Additionally, use the center point measurement cursor to pinpoint specific targets accurately. The thermal camera’s visible light camera comes in handy for increased precision in detecting potential problems.
Armed with these valuable insights, you can take prompt action to improve insulation, seal gaps, and upgrade cooling systems, ensuring a cooler, more energy-efficient environment for the summer.
Using the Thermal Camera in Winter
In the icy grasp of winter, the thermal camera proves its worth by uncovering hidden sources of heat loss and helping to optimize heating efficiency. To achieve accurate readings, perform inspections on chilly days. When the temperature difference is the highest between inside the home and outer environment.
Begin your thermal journey outside, scanning for reddish spots around doors, windows, and uninsulated walls, where heat might be escaping. Move indoors and focus on potential drafts and poorly insulated areas.
Indoors you want to seek blueish readings, indicating a rapid energy exchange spot that requires your attention.
Utilize the thermal camera’s palette options to enhance temperature contrasts and guide your attention to critical spots. The camera’s center point measurement cursor aids in precise temperature readings of target objects.
Take action to enhance insulation.
How To Fix The Discovered Energy/Thermal Leaks
Once you’ve used the infrared camera to identify energy leaks, it’s time to take corrective measures.
Here’s a step-by-step guide to help you fix those pesky leaks and save energy:
- Seal the Cracks: Start by sealing any visible cracks or gaps in walls, windows, and doors. Weatherstripping and caulking can be incredibly effective in preventing heat from escaping and cold air from entering.
- Enhance Insulation: Proper insulation is key to reducing energy leaks. Consider upgrading to high-quality insulation materials to ensure your home or business retains heat efficiently.
- Upgrade Windows and Doors: If your infrared camera revealed significant energy losses around windows and doors, it might be time to invest in energy-efficient replacements. Double or triple-pane windows and insulated doors can make a remarkable difference.
- Maintain HVAC Systems: Regularly inspect and maintain your heating, ventilation, and air conditioning (HVAC) systems to ensure they are operating optimally. Clean air filters and efficient HVAC units will not only save energy but also prolong the system’s lifespan.
- Utilize Smart Thermostats: Smart thermostats allow you to control the temperature settings remotely, optimizing energy usage and reducing wasteful heating or cooling. Read more about intelligent thermostats in this other article.
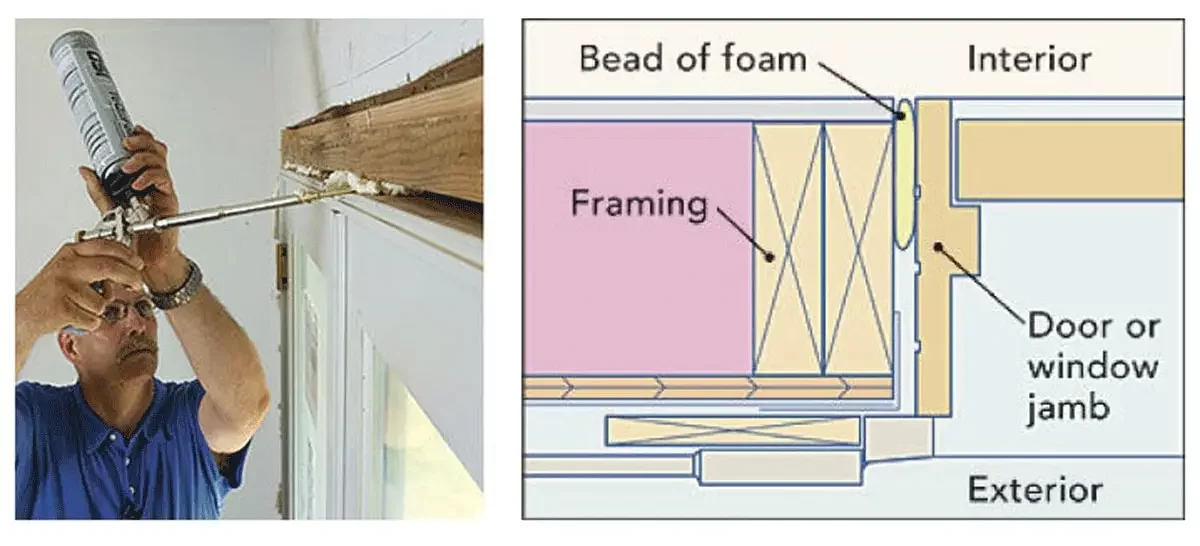
Learn how to fix common leaks step by step with spry foam: Air-Seal Windows and Doors. It is a fun DIY project with a few cheap products and tools.
Saving Money On The Energy Bill
Fixing energy leaks is not just an environmentally conscious decision but a financially prudent one as well.
By addressing these elusive inefficiencies, you can reap substantial savings on your energy bills and bolster your budget in the long run. While the initial fixing costs might require an investment, the returns are promising.
Start by conducting an infrared camera inspection to identify the energy leaks throughout your home or business. With this thermal insight, you can strategically tackle the most critical areas, such as poorly insulated walls, drafty windows, and inefficient HVAC systems.
Sealing cracks and gaps, upgrading to energy-efficient windows and doors, and enhancing insulation are practical measures to consider. The costs of these fixes can vary depending on the size of your property and the materials used. Still, estimates suggest that homeowners can save up to 30% on heating and cooling costs annually by addressing energy leaks.
Commercial establishments can also witness significant savings on their utility bills, enhancing their bottom line and making the initial investment in fixing energy leaks a prudent financial decision in the long term.
How Much Does The Thermal Camera Cost And Where to Get It?
The Thermal Cameras we have tested come at a competitive price ranging from $349 to $445.
While some may consider this an initial investment, it’s essential to recognize the long-term benefits that this device offers. With its exceptional build quality and cutting-edge technology, the thermal camera is designed to withstand the test of time and deliver reliable performance for years to come.
Its durable construction and efficient design ensure that it remains a steadfast companion throughout various projects, making it a cost-effective solution in the long run. By investing in this thermal camera, users gain access to a versatile and powerful device that pays for itself over time.
So, seize this opportunity to obtain a budget-friendly thermal camera that promises years of reliable service, and take charge of your energy conservation and problem-detection endeavors.
Infrared Thermal Camera by Wintact
This model is priced at $349, which is an excellent price for what it delivers. It has all the necessary options and capabilities for our mission to detect energy leaks.
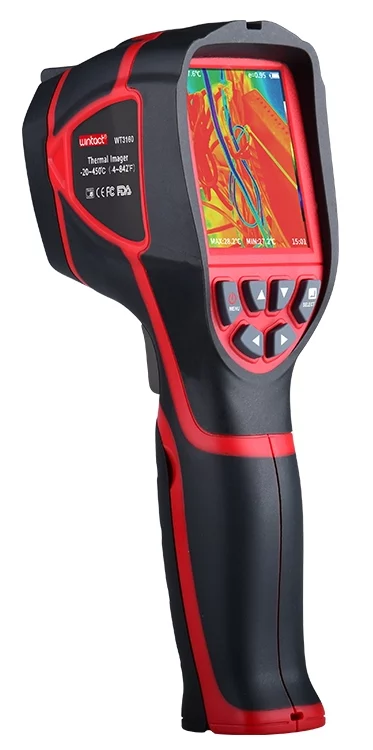
Get a 5% discount using the code: KMF2VDFH
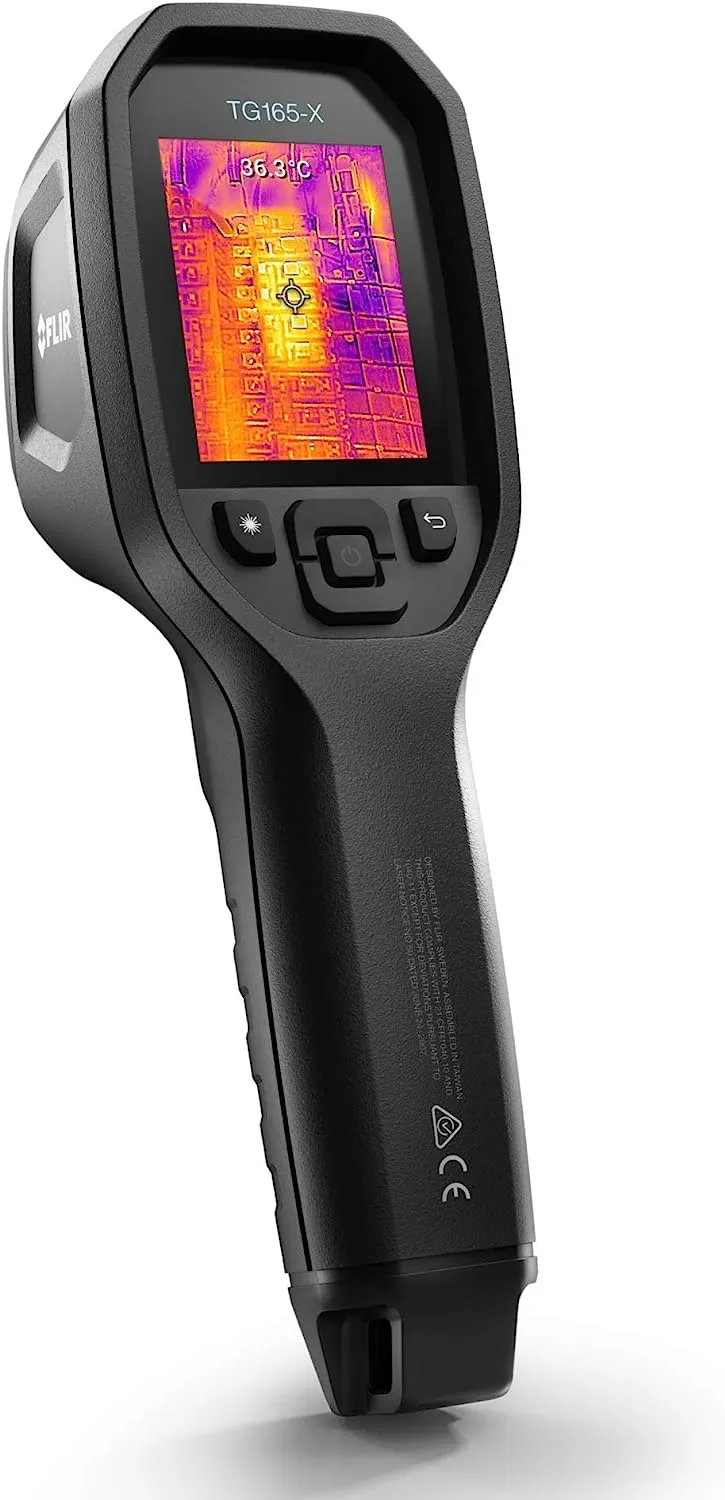
Bullseye by FLIR Thermal Camera
Another great option is the FLIR BULLSEYE, slightly more expensive than the other one above. At this moment it is priced $445, and we find it a great price.
Conclusion
Using an infrared camera to spot energy leaks is a game-changer in the realm of energy conservation.
With proper preparation, calibration, and a methodical approach, you can uncover hidden inefficiencies and address them proactively. Embrace the power of thermal imaging, and embark on a journey toward a more sustainable and energy-efficient future.
Read more about this topic: Achieving Sustainability: Innovative Solutions For A More Resilient Future.